The qtgrid Tutorial
When it comes to setup a QGridLayout the QtDesigner is a good choice for static requirements. But if you want to fill it up with your own data, not to mention a dynamic building process from scratch, you may find yourself struggling with cell indices and strange layout results, wondering whats happen at the latest on a window resize. Moreover, it's hard to debug, since there is for example no possibility to draw a border around each cell, like in HTML tables.
This is where qtgrid steps into the breach. Its main features are as follows:
- After presetting the maximum number of content columns add your widgets one by one, thus not bothering the indices.
- Activate the work_up mode during development time to have a visual feed back about the otherwise invisible spaces between your widgets.
- Apply expanding columns at the far left or right side to align the whole grid to the left, center, or right.
- Add gaps and expander for columns and rows to influence the layout.
- Prepare internal lists to hold your added widgets for your later disposal.
- Grid objects can be nested.
- Grid just handles the QGridLayout object for you. Due to that, you still can access it for operations, like setting designated options.
Well, if that arouse your curiosity, let's smirch our hands into all the gory details ...
Our Minimal Window
First of all, we need a minimal window to incorporate our examples. It is derived from QMainWindow, called DemoWindow, and its central widget holds a QVBoxLayout object with three items. The first at the top is a label marked "Demo", the second will be the place for our upcoming grid layout, and the bottom item has a stretchable vertical spacer preventing our grid from expanding downwards.
The following demo file is already importing the Grid class. It is instantiated in its own grid_instance() method and the returned grid object is composed as a property to the DemoWindow.
The build-up process for the grid is separately placed into the grid_build() method.
Note that qtgrid works in the same way for PyQt5, PyQt6, and PySide6.
# -*- coding: utf-8 -*-

import sys
from PyQt5.QtWidgets import QMainWindow, QApplication, QWidget, QVBoxLayout
from PyQt5.QtWidgets import QLabel, QGridLayout
from PyQt5.QtCore    import Qt
from PyQt5.QtGui     import QFont

from qtgrid import Grid

class DemoWindow(QMainWindow):
    """
    Derived Main Window
    """
    def __init__(self, *args, **kwargs):
        """
        Setup a central widget with a vertical layout.
        """
        super(DemoWindow, self).__init__(*args, **kwargs)
        self.setWindowTitle("Grid")
        widget       = QWidget()     # central widget
        main_vlayout = QVBoxLayout() # vertical layout

        # Compose and build up the grid
        self.grid = self.grid_instance()
        self.grid_build()

        # Fill the vertical layout

        # Top: label "Demo"
        top_label = QLabel("Demo")
        top_label.setAlignment( Qt.AlignCenter )
        main_vlayout.addWidget( top_label )

        # Middle: add the demo grid
        main_vlayout.addLayout( self.grid.layout )

        # Bottom: add a stretchable vertical spacer
        main_vlayout.addStretch()

        # Establish the vertical layout as the central widget
        widget.setLayout( main_vlayout )
        self.setCentralWidget( widget )

    def grid_instance(self):
        """
        Instantiation of Grid
        """
        grid = Grid()
        return grid

    def grid_build(self):
        """
        Build up the grid
        """
        # Do nothing yet.
        self.grid.finish()


if __name__ == "__main__":
    app = QApplication(sys.argv)
    mainWin = DemoWindow()
    mainWin.show()
    sys.exit( app.exec_() )
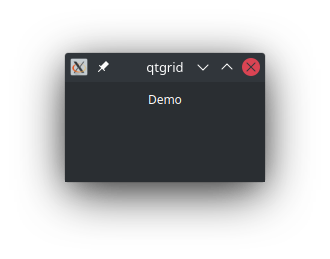
Unsurprisingly, there is not much to see now. But we have our grid_instance() and grid_build() methods where our code of interest will be put. The self.grid object has a self.grid.layout property holding a QGridLayout object. It was silently instantiated at construction time, since we did not pass our own layout object. The self.grid.finish() call is essential, but more on that in short.
Instantiate the Grid
Let's start rewriting both our grid_instance() and grid_build() methods. You may pass to the optional layout construction parameter a QGridLayout object, for example created with QtDesigner. Note that any items contained in it will be cleared out. In this example, we just instantiate QGridLayout without parameters.
    def grid_instance(self):
        """
        Instantiation of Grid
        """
        grid = Grid(
            layout          = QGridLayout(), # Optional QGridLayout object
            content_columns = 4,             # Maximum number of content columns
            expand_left     = False,         # Apply left side expander
            expand_right    = False,         # Apply right side expander

            # Show visual help while development time
            work_up = True
        )
        # QGridLayout settings
        grid.layout.setSpacing(1)
        return grid

    def grid_build(self):
        """
        Build up the grid
        """
        grid = self.grid
        grid.clear()

        ############
        # Add Wdgets

        # Label one
        label = QLabel("One")
        grid.add( label )

        ########
        # Finish
        grid.finish()
The idea of Grid is to dynamically add widgets one by one without thinking about cell indices in the grid. Thus, the content_columns option is used to let Grid overtake the tedious counting rightly. Its value is related to the number of columns containing the actual content, not counting the (possibly) expanding far left or right columns.
The expand_left and expand_right options, when set to True, add corresponding extra columns to the far left and right with stretchable horizontal spacer. This way you can align the whole grid to the left, center, or right.
The work_up option is your friend while you implement the grid layout and its content. When set to True, you'll see colored labels with column index numbers in place of gaps or expander and for yet unused cells.
Note that we configured the wrapped QGridLayout object, hold in the grid.layout property, right after instantiation.
You may set any Grid options at construction time or with proper setter methods as described in the qtgrid reference manual.
Beside adding a label widget, within the grid_build() method we were using two other important calls. The clear() method is not really necessary here, since the build process is triggered just once. But it's another matter in a dynamic setup, where the grid might be build after a pressed button. In that case you need to clear the grid, otherwise all widgets would be added repeatedly.
After all widgets have been added, don't forget to call the conclusive method grid.finish(). This actually applies the widgets, gaps, and expander to the underlying QGridLayout, or corresponding colored labels with column indices in work_up mode. If you don't call this, you'll see a reminding text in place of your grid. Check this out by commenting out the grid.finish() line and see what happen.
We now have a grid which actually has one row with four columns, and a label in the first cell. This is how it looks like:
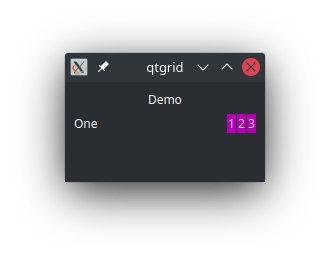
Because the work_up option is True, there are magenta colored cells with their column index numbers, indicating free space for widgets to be added. And this is what we do next.
Simply Add Widgets
For now, please go back to the grid_build() method and add the following lines:
    def grid_build(self):
        """
        Build up the grid
        """
        grid = self.grid
        grid.clear()

        ############
        # Add Wdgets

        # Label one
        label = QLabel("One")
        grid.add( label )

        # Add a gap with a fixed size
        grid.add_gap(20)

        # Label two
        label = QLabel("Two")
        grid.add( label )

        ########
        # Finish
        grid.finish()
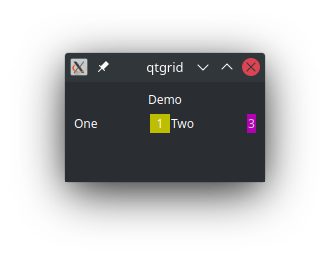
With the add() method you can add any widget to your grid. It has more usable options, like spanning over columns and rows or retaining the passed widget in a previously prepared list. But more on that later. The add_gap() method does what is says and will also be discussed in more detail in the next chapters.
We decided to have a 20 pixel gap between the first and second label. In the current work_up mode we're able to assure that by the yellow colored cell at the right place (index 1). If you now resize the window, then the grid is stretched. Nevertheless, the yellow marked gap remains its size.
How to Layout
It is essentially the gaps, expander, or empty cells which influence your grid layout. Thus, it's worth the effort to take a closer look at.
Left and Right Expander for Grid Alignment
In the previous example (fig.3: Simple Adds), we were happy with the fixed gap. But apart from that, we want the grid to be left aligned and not being stretched as a whole. To do so, change within the grid_instance() method the boolean construction option expand_right from False to True. Beyond that, we omit the layout option again, resulting in an internally instantiated QGridLayout object.
    def grid_instance(self):
        """
        Instantiation of Grid
        """
        grid = Grid(
            content_columns = 4,     # Maximum number of content columns
            expand_left     = False, # Apply left side expander
            expand_right    = True,  # Apply right side expander

            # Show visual help while development time
            work_up = True
        )
        # QGridLayout settings
        grid.layout.setSpacing(1)
        return grid
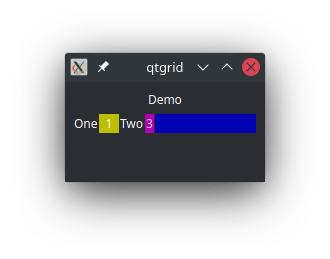
You see, a further blue colored cell is added to the right. It contains a stretchable horizontal spacer making sure all cells to the left remains as we want, despite of a window resize. If you add subsequent rows the expanding cells in the right column are automatically incorporated.
Empty Cells
Next, fill up the last unused cell (colored magenta) in the first row. In doing so, we use the earlier seen grid.add_gap() method, but with no arguments. This will left the grid cell as is and means in Qt terms, calling the isEmpty() method on the QLayoutItem object representing this cell would return a True value.
Beside that, we also add a second row:
    def grid_build(self):
        """
        Build up the grid
        """
        grid = self.grid
        grid.clear()

        #############
        # Add widgets

        # First row
        # ---------
        # Label "One"
        label = QLabel("One")
        grid.add( label )

        # Add a gap with a fixed size
        grid.add_gap(20)

        # Label "Two"
        label = QLabel("Two")
        grid.add( label )

        # Leave this cell explicitly empty.
        grid.add_gap()

        # We added four elements: Two labels and two gaps.
        # Since the 'content_columns' value is 4,
        # the next Element will be added to the next row.

        # Second row
        # ----------
        grid.add( QLabel("Three") ) # Three
        grid.add_gap(20)            # A fixed size gap
        grid.add( QLabel("Four") )  # Four
        grid.add_gap()              # An explicit empty cell

        ########
        # Finish
        grid.finish()
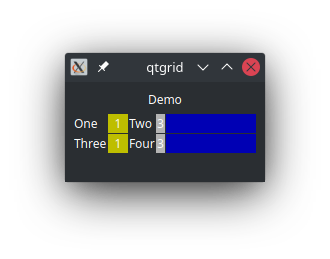
It appears that a expander is automatically added to the right side. The empty cells we added with grid.add_gap() directly before those expanders are marked with a gray color.
A Row Gap
In the next step change the boolean value of the Grid construction option expand_left to True, which will center our grid.
    def grid_instance(self):
        """
        Instantiation of Grid
        """
        grid = Grid(
            content_columns = 4,
            expand_left     = True, # Apply left side expander
            expand_right    = True, # Apply right side expander

            # Show visual help
            work_up = True
        )
        # QGridLayout settings
        grid.layout.setSpacing(1)
        return grid
Further, in our grid_build() method we replace both empty cells with a label. Also, we add more rows. One of them is a row gap.
    def grid_build(self):
        """
        Build up the grid
        """
        grid = self.grid
        grid.clear()

        #############
        # Add widgets

        # First row
        # ---------
        # Label "One"
        label = QLabel("One")
        grid.add( label )

        # Add a gap with a fixed size
        grid.add_gap(20)

        # Label "Two"
        label = QLabel("Two")
        grid.add( label )

        # Label "right" (instead of an empty cell)
        label = QLabel("right")
        grid.add( label )

        # Second row
        # ----------
        grid.add( QLabel("Three") )  # Three
        grid.add_gap(20)             # fixed gap
        grid.add( QLabel("Four") )   # Four
        grid.add( QLabel("right") )  # right

        # Add a fixed row gap
        # -------------------
        grid.add_empty_row(20)

        # Third row
        # ---------
        grid.add( QLabel("Five") )   # Five
        grid.add_gap(20)             # fixed gap
        grid.add( QLabel("Six") )    # Six
        grid.add( QLabel("right") )  # right

        # Fourth row
        # ----------
        grid.add( QLabel("Seven") )  # Seven
        grid.add_gap(20)             # fixed gap
        grid.add( QLabel("Eight") )  # Eight
        grid.add( QLabel("right") )  # right

        ########
        # Finish
        grid.finish()
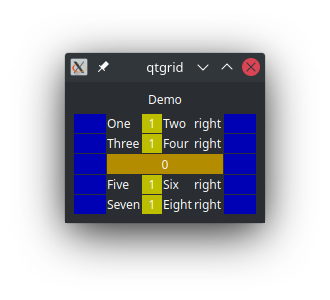
If you think about loops when looking at the rows, you're headed the right direction. But for now, you see our grid is centered and our orange colored row gap has a fixed height of 15 pixel and is located where expected. In the code example we added it at the beginning of a row, but this is not a premise. You can add row gaps in the middle of a line, resulting in a row gap below that line.
Horizontal Cell Expander and Vertical Row Expander
So far, we have added gaps involving space of some size between columns and rows. But you may also add horizontal or vertical expander using the same methods. To test that, we now replace the label "Two" with a horizontal expander and our row gap with a vertical row expander.
    def grid_build(self):
        """
        Build up the grid
        """
        grid = self.grid
        grid.clear()

        #############
        # Add widgets

        # First row
        # ---------
        # Label "One"
        label = QLabel("One")
        grid.add( label )

        # A fixed size gap
        grid.add_gap(20)

        # Horizontal expander (instead of label "Two")
        grid.add_gap("expand")

        # Label "right"
        label = QLabel("right")
        grid.add( label )

        # Second row
        # ----------
        grid.add( QLabel("Three") )  # Three
        grid.add_gap(20)             # fixed gap
        grid.add( QLabel("Four") )   # Four
        grid.add( QLabel("right") )  # right

        # Add vertical row expander
        # -------------------------
        grid.add_empty_row("expand")

        # Third row
        # ---------
        grid.add( QLabel("Five") )   # Five
        grid.add_gap(20)             # fixed gap
        grid.add( QLabel("Six") )    # Six
        grid.add( QLabel("right") )  # right

        # Fourth row
        # ----------
        grid.add( QLabel("Seven") )  # Seven
        grid.add_gap(20)             # fixed gap
        grid.add( QLabel("Eight") )  # Eight
        grid.add( QLabel("right") )  # right

        ########
        # Finish
        grid.finish()
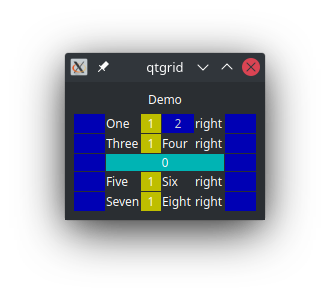
Resize the window to see the effect. Not to mention the outer left and right expanding columns, there is now a single horizontal expander in our first row. Also the row gap is now expanding vertically and changed its color to cyan to indicate it is not of a fixed size.
This leads us to find that the add_gap() and add_empty_row() methods can be called in the following ways:
grid.add_gap()         # leave cell explicitly empty
grid.add_gap(n)        # add a gap of n-pixel width
grid.add_gap("expand") # expand horizontally
grid.add_empty_row()         # left all cells in (next) row empty
grid.add_empty_row(n)        # add a row gap of n-pixel height
grid.add_empty_row("expand") # expand vertically
What I did not mention yet is that the add_gap() method inserts the cell gaps with horizontal extent by default. This means, you can also add gaps with vertical extent. To do that you must add the string "vertical" or "V" as the first argument:
grid.add_gap("V")           # leave cell explicitly empty
grid.add_gap("V", n)        # add a gap of n-pixel height
grid.add_gap("V", "expand") # expand vertically
Predefined Column Gaps
Now, reexamine our rows. There are the yellow marked cells representing our fixed sized gaps which we had to include in each row. This can be a bit pesky in bigger sized grids. Due to that, we now use the column_gaps option during construction time of our grid object.
    def grid_instance(self):
        """
        Instantiation of Grid
        """
        grid = Grid(
            content_columns = 4,
            expand_left     = True, # left side expander
            expand_right    = True, # right side expander

            column_gaps = [
                (1, 15) # (column_index, width)
                        #   The 'columns_index' range is from 0 to (content_columns - 1)
            ],

            # Show visual help
            work_up = True
        )
        # QGridLayout settings
        grid.layout.setSpacing(1)
        return grid
This way Grid adds the gap cells for us at the designated column, so we can remove each grid.add_gap(20) method call from each row in our previous code. And while we are on it, we replace the horizontal expander in the first row again with the label "Two".
    def grid_build(self):
        """
        Build up the grid
        """
        grid = self.grid
        grid.clear()

        #############
        # Add widgets

        # First row
        # ---------
        # Label "One"
        label = QLabel("One")
        grid.add( label )

        # Label "Two"
        label = QLabel("Two")
        grid.add( label )

        # Label "right"
        label = QLabel("right")
        grid.add( label )

        # Second row
        # ----------
        grid.add( QLabel("Three") )  # Three
        grid.add( QLabel("Four") )   # Four
        grid.add( QLabel("right") )  # right

        # Add vertical row expander
        grid.add_empty_row("expand")

        # Third row
        # ---------
        grid.add( QLabel("Five") )   # Five
        grid.add( QLabel("Six") )    # Six
        grid.add( QLabel("right") )  # right

        # Fourth row
        # ----------
        grid.add( QLabel("Seven") )  # Seven
        grid.add( QLabel("Eight") )  # Eight
        grid.add( QLabel("right") )  # right

        ########
        # Finish
        grid.finish()
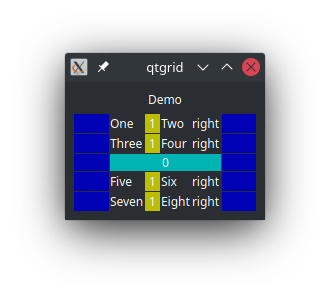
After using the column_gaps option we have the chance to unclutter the adds for each row a bit.
The column_gaps option takes a list with a number of 2-tuples. Each tuple defines a column gap with the index number as the first argument and its width as the second. The range is from 0 to (content_columns - 1).
As of add_gap() and add_empty_row(), there are again three ways to define the column gaps:
   column_gaps = [
       # (column_index, width)

       # Leave all cells in column 1 explicitly empty.
       # You might also write None instead of 0.
       (1, 0),

       # All cells in column 1 have a width of 20 pixels.
       (1, 20),

       # All cells in column 1 contain a horizontal expander.
       (1, "expand"),
   ],
By now, all colors which may be shown in work up mode are emerged. For a list of them and their meaning, consider the set_work_up() method in the qtgrid reference manual.
Add Widgets Reissued
As aforementioned, the add() method has some useful options. We now going to see how to span a cell over several columns and rows, and how to keep a added widget in an internal list to have it at our disposal for later use. To have a common basis, here is the complete source of both our methods with slight changes:
    def grid_instance(self):
        """
        Instantiation of Grid
        """
        grid = Grid(
            content_columns = 4,
            expand_left     = True,
            expand_right    = True,
            column_gaps     = [
                (1, 20), # (column_index, width)
            ],
            # Show visual help
            work_up = True
        )
        # QGridLayout settings
        grid.layout.setSpacing(1)
        return grid
    def grid_build(self):
        """
        Build up the grid
        """
        grid = self.grid
        grid.clear()

        #############
        # Add widgets

        # First row
        # ---------
        grid.add( QLabel("One") )   # One
        grid.add( QLabel("Two") )   # Two
        grid.add( QLabel("right") ) # right

        # Second row
        # ----------
        grid.add( QLabel("Three") ) # Three
        grid.add( QLabel("Four") )  # Four
        grid.add( QLabel("right") ) # right

        # Third row
        # ---------
        grid.add( QLabel("Five") )  # Five
        grid.add( QLabel("Six") )   # Six
        grid.add( QLabel("right") ) # right

        # Fourth row
        # ----------
        grid.add( QLabel("Seven") ) # Seven
        grid.add( QLabel("Eight") ) # Eight
        grid.add( QLabel("right") ) # right

        ########
        # Finish
        grid.finish()
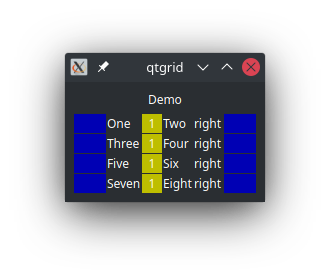
Spans
Let's try out to span the "Four" label in the second row across two columns and rows. Therefore, we can use the y_span and x_span options:
        # Second row
        # ----------
        grid.add( QLabel("Three") ) # Three

        # A 2x2 span of label "Four"
        label = QLabel("Four")
        label.setAlignment( Qt.AlignCenter )
        grid.add( label, y_span=2, x_span=2 )

        grid.add( QLabel("right") ) # right
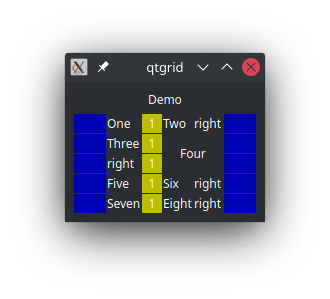
While spanning over a 2 times 2 square the subsequent adds fill up the cells, resulting in five rows instead of four. To get an idea of how the span options operate, we now apply a high value (10) to both the y_span and x_span options.
grid.add( label, y_span=10, x_span=10 )
Also, add the following lines below the last row to add some test labels:
        # Test adds
        for i in range (0, 5):
            grid.add( QLabel("Test"+str(i+1)) )
This reveals the follwing outcome:
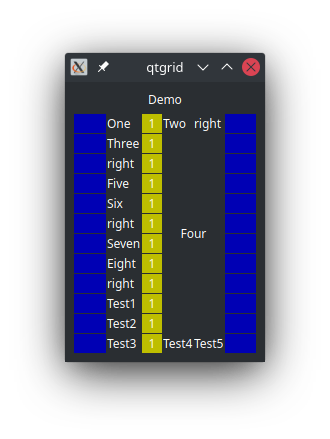
It turns out that the excess x_span value is simply ignored beyond the content_columns value, while the y_span continues downwards until it fulfills what it has been told.
Span Over the Remaining Row
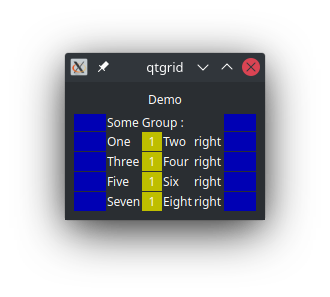
There is a convenient way to span a added widget over the remaining columns in a row by using the string value "all" for the x_span argument. An occasion would be when adding a label heading a group of widgets.
grid.add( QLabel("Some Group :"), x_span="all" )
If that line is applied before the first row in our base example (fig.9) the outcome would be as follows. Note that the column gap is silently overlapped.
Prepared Lists
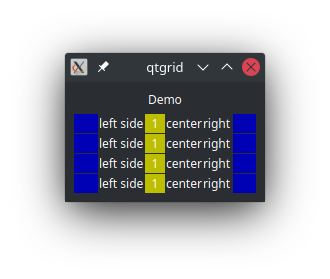
Sooner or later you want to access the widgets after you added them to your grid, especially in a dynamic setup. Be it you want to read from input widgets such as line edits, spin boxes, sliders or you want to write informative text to a label. In the following example we do the latter, although it is a bit artificial here. Typically you compose the instantiated Grid object as a property to another class, from where you can access the prepared lists. Here, for the sake of simplicity, we do that right after we added the widgets in our grid_build() method.
To "prepare lists" actually means, we tell Grid to define lists internally with given names. Due to that, we use another construction option called list_names. It takes itself a list of that mentioned names:
            # Prepare your own lists, to access your added widgets afterwards
            list_names = ["labels_left", "labels_center"],
Now, within the add() method, we can use the to_list argument to also add the widget to the desired internal list at one go:
        # First row
        # ---------
        grid.add( QLabel("One"), to_list="labels_left" )   # One
        grid.add( QLabel("Two"), to_list="labels_center" ) # Two
        grid.add( QLabel("right") )                        # right
Repeat this for the other rows. Then, to access the internal lists, use the get_list() method in the following manner:
        # Access my added widgets in grid
        labels_left   = grid.get_list("labels_left")
        labels_center = grid.get_list("labels_center")
        for i in range( len(labels_left) ):
            left   = labels_left[i]
            center = labels_center[i]
            # Overwrite the labels
            left.setText("left side")
            center.setText("center")
To not get confused, here is the code of both our methods:
    def grid_instance(self):
        """
        Instantiation of Grid
        """
        grid = Grid(
            content_columns = 4,
            expand_left     = True,
            expand_right    = True,
            column_gaps     = [
                (1, 20) # (column_index, width)
            ],

            # Prepare your own lists, to access your added widgets afterwards.
            list_names = ["labels_left", "labels_center"],

            # Show visual help
            work_up = True
        )
        # QGridLayout settings
        grid.layout.setSpacing(1)
        return grid
    def grid_build(self):
        """
        Build up the grid
        """
        grid = self.grid
        grid.clear()

        #############
        # Add widgets

        # First row
        # ---------
        grid.add( QLabel("One"), to_list="labels_left" )   # One
        grid.add( QLabel("Two"), to_list="labels_center" ) # Two
        grid.add( QLabel("right") )                        # right

        # Second row
        # ----------
        grid.add( QLabel("Three"), to_list="labels_left" )   # Three
        grid.add( QLabel("Four"),  to_list="labels_center" ) # Four
        grid.add( QLabel("right") )                          # right

        # Third row
        # ---------
        grid.add( QLabel("Five"), to_list="labels_left" )   # Five
        grid.add( QLabel("Six"),  to_list="labels_center" ) # Six
        grid.add( QLabel("right") )                         # right

        # Fourth row
        # ----------
        grid.add( QLabel("Seven"), to_list="labels_left" )   # Seven
        grid.add( QLabel("Eight"), to_list="labels_center" ) # Eight
        grid.add( QLabel("right") )                          # right

        ########
        # Finish
        grid.finish()

        ###########################
        # Access my widgets in grid
        labels_left   = grid.get_list("labels_left")
        labels_center = grid.get_list("labels_center")
        for i in range( len(labels_left) ):
            left   = labels_left[i]
            center = labels_center[i]
            # Overwrite the labels
            left.setText("left side")
            center.setText("center")
Common Labels and Headers
The qtgrid package is mainly about widgets layout. Though, the labels you're using should be probably of a common design. There might be bold text heading appointed sections or at least you want some sort of fonts and margins around the text. On the one hand, to vary the design later on could be tedious, if you had to apply it individually. On the other hand, writing the code to configure your labels right before you add them blows your code up and makes it unclear. One solution path might be the prepared lists as seen in the last chapter. But there is a more nifty way that (can) obviate the need for lists in this case.
The basic concept is to first create all kinds of label types before you proceed to work up your grid. Note that this includes headers as well, since headers are nothing but labels. Then, after object construction, you tell Grid to take your labels as a blueprint. Say, we have initialized a variable named laBold with an appropriate configured QLabel object. Then, the following method stores it internally:
grid.set_label_source( name_id="bold", label=laBold )
The value of the name_id argument is the key if you want to make use of it along with the add_label() method:
grid.add_label( name_id="bold", text="One:" )
grid.add_label("bold", "One:")
Under the hood, this instantiates a fresh new QLabel() object, applies the text "One:" to it and performs a deep copy of all attributes from laBold to this new label. In case you think of future use, you still can take recourse to prepared lists along with the to_list argument.
grid.add_label("bold", "One:", to_list="labels_left")
All in all, the following are now our two methods. Note that the work_up option is set this time to False.
    def grid_instance(self):
        """
        Instantiation of Grid
        """
        grid = Grid(
            content_columns = 4,
            expand_left     = False,
            expand_right    = True,
            column_gaps     = [
                (1, 20) # (column_index, width)
            ],
            # Show visual help
            work_up = False
        )
        # QGridLayout settings
        grid.layout.setSpacing(1)
        return grid
    def grid_build(self):
        """
        Build up the grid
        """
        grid = self.grid
        grid.clear()

        ##################
        # Configure labels

        # header
        laHeader = QLabel()
        laHeader.setMargin( 5 )

        font = QFont()
        font.setFamily("Helvetica")
        font.setBold(True)
        font.setUnderline(True)
        font.setPointSize( 12 )
        laHeader.setFont( font )

        # normal
        laNormal = QLabel()
        laNormal.setMargin( 5 )

        # bold
        laBold = QLabel()
        laBold.setAlignment( Qt.AlignVCenter | Qt.AlignRight )
        laBold.setMargin( 5 )

        font = QFont()
        font.setFamily("Sans")
        font.setBold(True)
        font.setPointSize( 9 )
        laBold.setFont( font )

        ###################
        # Set label sources
        grid.set_label_source( name_id="hdr1",   label=laHeader )
        grid.set_label_source( name_id="normal", label=laNormal )
        grid.set_label_source( name_id="bold",   label=laBold )

        #############
        # Add widgets

        # Header row
        # ----------
        grid.add_label("hdr1", "Header A")
        grid.add_label("hdr1", "Header B", x_span=2 )

        # First row
        # ---------
        grid.add_label("bold",   "One:")  # One
        grid.add_label("normal", "Two")   # Two
        grid.add_label("normal", "right") # right

        # Second row
        # ----------
        grid.add_label("bold",   "Three:") # Three
        grid.add_label("normal", "Four")   # Four
        grid.add_label("normal", "right")  # right

        # Third row
        # ---------
        grid.add_label("bold",   "Five:") # Five
        grid.add_label("normal", "Six")   # Six
        grid.add_label("normal", "right") # right

        # Fourth row
        # ----------
        grid.add_label("bold",   "Seven:") # Seven
        grid.add_label("normal", "Eight")  # Eight
        grid.add_label("normal", "right")  # right

        ########
        # Finish
        grid.finish()
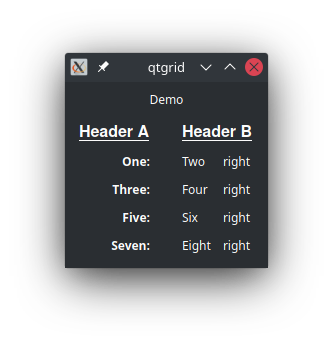
As implementable this is, you might not want to grapple with label configuration in an early stage. Therefore, the following two keywords are intended as stepping-stones: "default" and "default-header". Both are preconfigured labels, although not claiming to be of magnificent design. But this let you instantly give your grid a go, focusing on layout in the first place.
grid.add_label("default-header", "Some Header")
grid.add_label("default", "Some text")
Tip: When it comes to design issues, you may want to use Qt Style Sheets which is mostly like CSS for HTML.
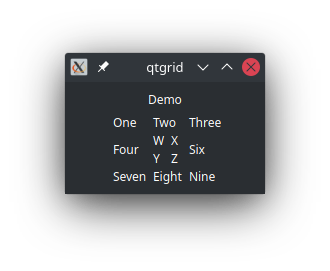
Nested Grid's
You can nest Grid objects by adding them to a cell as you would do for other widgets. There is not much to tell about, thus consider this self speaking example:
    def grid_instance(self):
        """
        Instantiation of Grid
        """
        grid = Grid(
            content_columns = 3,
            expand_left     = True,
            expand_right    = True,
            work_up         = False
        )
        # QGridLayout settings
        grid.layout.setSpacing(1)
        return grid
    def grid_build(self):
        """
        Build up the grid
        """
        grid = self.grid # this is the outer grid
        grid.clear()

        ##################################
        # Instantiate the inner Grid
        inner_grid = Grid(
            content_columns = 2,
            expand_left     = False,
            expand_right    = False,
            work_up         = False
        )
        # QGridLayout settings
        inner_grid.layout.setSpacing(1)
        inner_grid.clear()

        ############
        # Inner Grid
        inner_grid.add_label("default", "W")
        inner_grid.add_label("default", "X")
        inner_grid.add_label("default", "Y")
        inner_grid.add_label("default", "Z")
        inner_grid.finish()

        ############
        # Outer Grid
        grid.add_label("default", "One")
        grid.add_label("default", "Two")
        grid.add_label("default", "Three")
        grid.add_label("default", "Four")

        grid.add( inner_grid ) # nest the grids

        grid.add_label("default", "Six")
        grid.add_label("default", "Seven")
        grid.add_label("default", "Eight")
        grid.add_label("default", "Nine")
        grid.finish()
At this juncture, this was it from my end. I hope the Grid package is a helpful tool for you. For your daily work you may take a look at the qtgrid reference manual and if you have hints for me related to this tutorial, don't hesitate to send me an email.
Thanx, and happy coding
Detlef von der Hülst (devlog@gmx.de)